Distributed Tracing
Easegress tracing is based on OpenTelemetry. We can enable tracing in Traffic Gates, for example, in HTTPServer, we can do this by defining the tracing entry. Tracing creates spans containing the tracing service name (tracing.serviceName) and other information. The matched pipeline will start a child span, and its internal filters will start children spans according to their implementation and configuration. For example, the Proxy filter has a specific span implementation.
kind: HTTPServer
name: http-server-example
port: 10080
tracing:
  serviceName: httpServerExample
  sampleRate: 1
  exporter:
    zipkin:
      endpoint: http://localhost:9412/api/v2/spans
rules:
  - paths:
    - pathPrefix: /pipeline
      backend: pipeline-example
Custom attributes
Custom attributes can help to further filter and debug tracing spans. Here’s an example with custom attribute customAttributeKey with value customAttributeValue:
kind: HTTPServer
name: http-server-example
port: 10080
tracing:
  serviceName: httpServerExample
  attributes:                             # add "attributes" entry and tags as key-value pairs
    customAttributeKey: customAttributeValue
  sampleRate: 1
  exporter:
    zipkin:
      endpoint: http://localhost:9412/api/v2/spans
rules:
  - paths:
    - pathPrefix: /pipeline
      backend: pipeline-example
Exporter
In the above example, we can see that we are sending span to Zipkin, thanks to the standardization of OpenTelemetry, we can also send span to other tracing backend, which currently supports Jaeger, Zipkin, OTLP (OpenTelemetry Collector), you can refer to tracing for details.
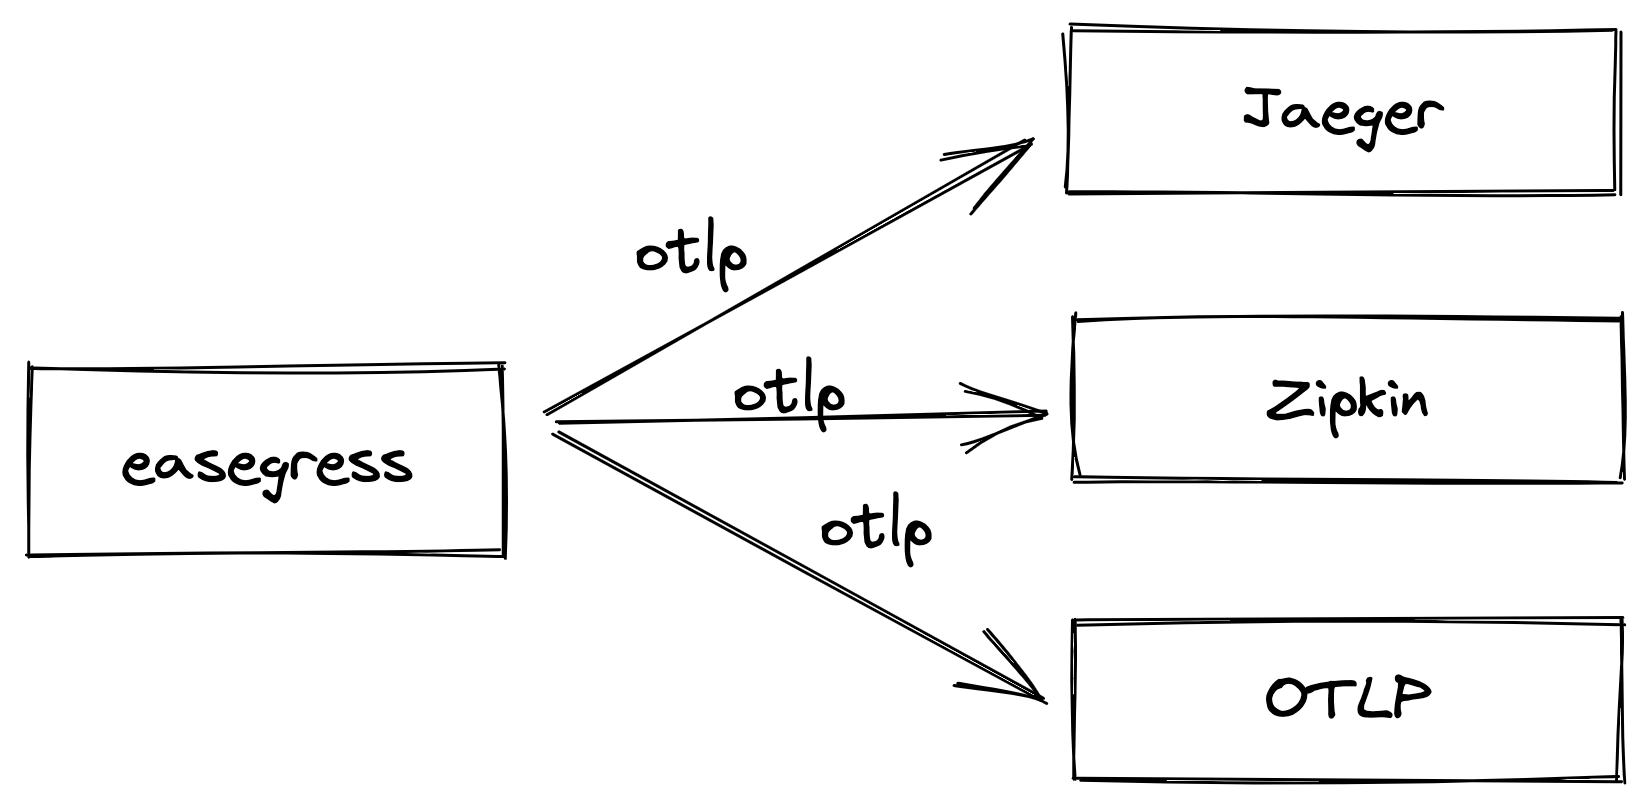
You can configure more than one exporter at a time, so let’s look at an example to understand.
kind: HTTPServer
name: http-server-example
port: 10080
tracing:
  serviceName: httpServerExample
  sampleRate: 1
  exporter:
    zipkin:
      endpoint: http://localhost:9412/api/v2/spans
    jaeger:
      mode: agent
      endpoint: localhost:6831
    otlp:
      protocol: grpc
      endpoint: localhost:4317
      insecure: true
rules:
  - paths:
    - pathPrefix: /pipeline
      backend: pipeline-example
Backward Compatibility
In the current version, you can still use the same configuration as before, but there are still some minor differences that need to be adjusted, as you can see in the following example.
kind: HTTPServer
name: http-server-example
port: 10080
tracing:
  serviceName: httpServerExample
  tags: # Deprecated: This option will be kept until the next major version incremented release.
    customTagKey: customTagValue
  zipkin:
    hostport: 0.0.0.0:10080 # This option will no longer be used
    serverURL: http://localhost:9412/api/v2/spans
    sampleRate: 1
    sameSpan: true # This option will no longer be used
    id128Bit: false # # This option will no longer be used
rules:
  - paths:
    - pathPrefix: /pipeline
      backend: pipeline-example
The adjusted example should look like this.
kind: HTTPServer
name: http-server-example
port: 10080
tracing:
  serviceName: httpServerExample
  tags: # Deprecated: This option will be kept until the next major version incremented release.
    customTagKey: customTagValue
  zipkin:
    serverURL: http://localhost:9412/api/v2/spans
    sampleRate: 1
rules:
  - paths:
    - pathPrefix: /pipeline
      backend: pipeline-example
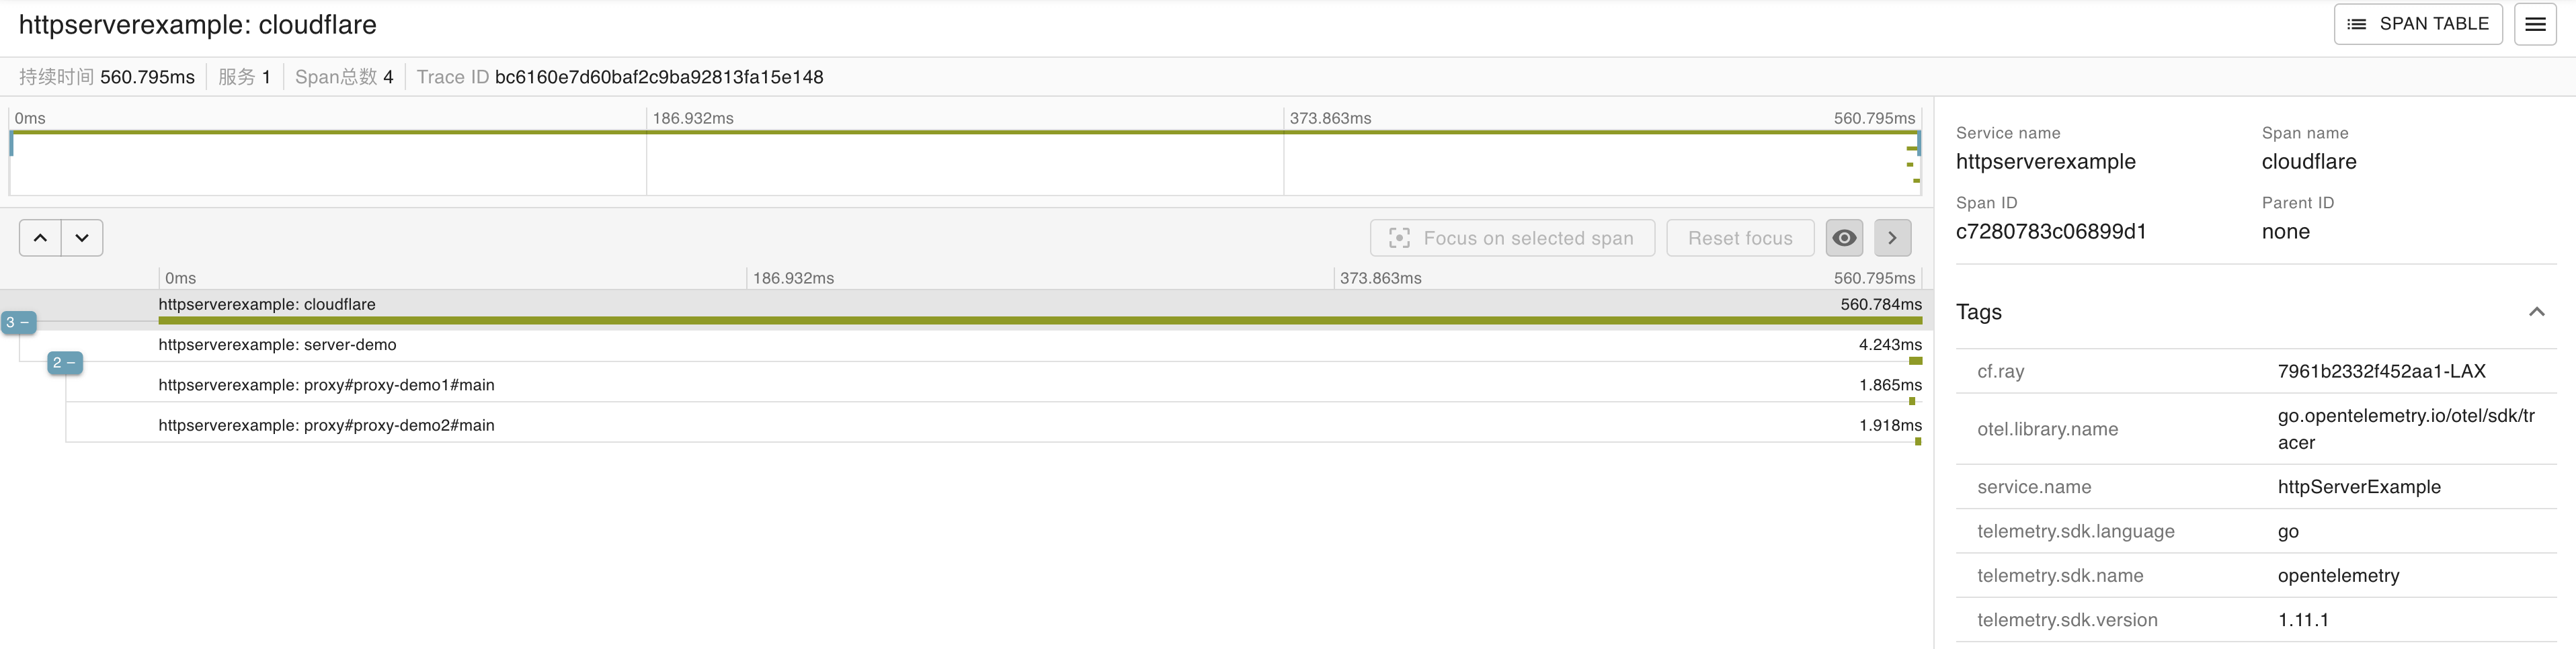
Usage with Cloudflare
If a request comes from Cloudflare, the HttpServer span will have a cf.ray tag with the value of the Cloudflare RayID automatically.
You can also have a Cloudflare span over the HttpServer span.
To achieve that you need to add headers of the timestamps when the traffic enters Cloudflare.
- Go to your website in Cloudflare dashboard.
- Go to Rules -> Transform Rules -> Modify Request Header then create a rule.
- Add two dynamic headers:
- “x-ts-msec”:“http.request.timestamp.msec”
- “x-ts-sec”:“http.request.timestamp.sec”
